
colidescope
/guides/ intro-to-python
colidescope
/guides/ intro-to-pythonIntro to Python
This guide will introduce the programming language Python and demonstrate how it can be used within Grasshopper to access Rhino's core geometric functions
+Introduction
In this guide you will learn how to access the Python programming language from within the Grasshopper environment by using the special Python component. You will also complete a short exercise that shows you how to access several Rhino libraries in Python so you can start working with Rhino geometry in your code.
Grasshopper, despite being a great platform for computational design, can also be limiting when trying to incorporate more complex programming elements. On the other hand, programming directly with computer code in a programming language like Python gives us much more control over our algorithms and allows us to develop more complex and interesting solutions but has a much higher learning curve and can be quite intimidating when first starting out.
So how do we choose one over the other? Luckily we don't have to! In fact we can easily extend the basic functionality of Grasshopper with Python code by embedding it directly into special Python components that can then interact with other components in our definition. This allows us to rely mostly on Grasshopper for basic elements, and use code only when necessary for more complex functionality.
+Why Python?
Python is only one of many languages around today—so why should we choose to work with Python?
On its own merit, Python has many benefits: it is a general-purpose high-level programming language with many features such as object-oriented programming which you would expect from a modern programming language. Although Python has been around for a while, in recent years it has become extremely popular in a variety of fields outside of computer programming such as science, medicine, statistics, math, and machine learning. This popularity can be attributed to Python's:
- Relatively simple syntax, with a focus on simplicity, clarity, and readability which makes it less complicated to learn and write
- Extensibility through a large collection of external libraries
- A huge support community of active users
Unlike more complex languages such as C++ or Java, Python is not often used for full software development. Because of it's emphasis on ease of use, it also tends to be less efficient and somewhat slower than these languages, but this is usually not an issue for applications outside of software development.
Lately, many different design software have begun adopting Python as a scripting language. This includes ArcGIS, QGIS, Rhino, Solidworks, and Autodesk Fusion. This is a big change from earlier years when every design tool had its own proprietary scripting language (Rhinoscript for Rhino, EKL for Catia, Actionscript for Illustrator), making you learn a whole new language each time you used a new tool. Integrating Python as a standard scripting language allows designers to learn a single language and use it to control a variety of design software. So if you are not a programmer but want to learn one programming language that will give you the most use in your design career, there is a strong argument that the language should be Python.
+Python in Rhino and Grasshopper
Starting in version 5, Rhino has Python directly embedded alongside (and as an eventual replacement for) Rhinoscript. In addition to running any standard Python code, it can also import the Rhino API which allows you to work with Rhino's native classes including all of it's geometry types. Using these libraries, designers can use Python to control almost every feature of Rhino, from the model geometry, to its views, cameras, and even the user interface.
You can also work with Python directly in Grasshopper through a special Python component. In the past you needed to download an external Grasshopper library to get access to this component but the Grasshopper included in the latest versions of Rhino (starting with version 6) come with this component installed. This means there is nothing extra to install and as long as you have Rhino 6 or above you have everything you need to start working with Python in Grasshopper.
The great thing about working with Python in Grasshopper is that it allows you to mix and match between working with code and normal Grasshopper components. This way, there is no pressure to develop your entire model just through code starting with a blank text file, which can be very intimidating for those just starting out with scripting or computational design.
Instead, you can develop most of the model using standard Grasshopper components, and only use Python code to do more complex tasks that are difficult or impossible in standard Grasshopper. In this way, the Python component provides a great gateway into the possibilities of using code for computational design. You can start off by writing small, simple scripts for specific purposes, and gradually develop more and more complex code as you learn.
+Using the Python component
To get started with Python in Grasshopper, you can find the Python component in the Maths tab of Grasshopper.
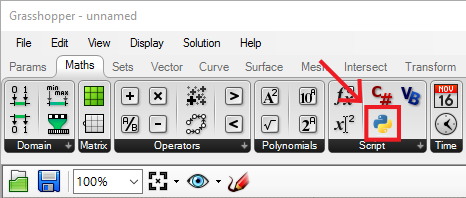
Let's put one of these components onto the canvas and see how it works. You can see that the Python component has input and output ports just like any other component in Grasshopper, except it can have any number of inputs and outputs and you can call them whatever you want.
You can add more inputs and outputs by zooming in on the component until you see minus icons appear next to the input/output names and plus icons appear between them. You can use these icons to either add or remove inputs and outputs. You can also rename them by right clicking on the name and entering a new name in the text box at the top of the menu.
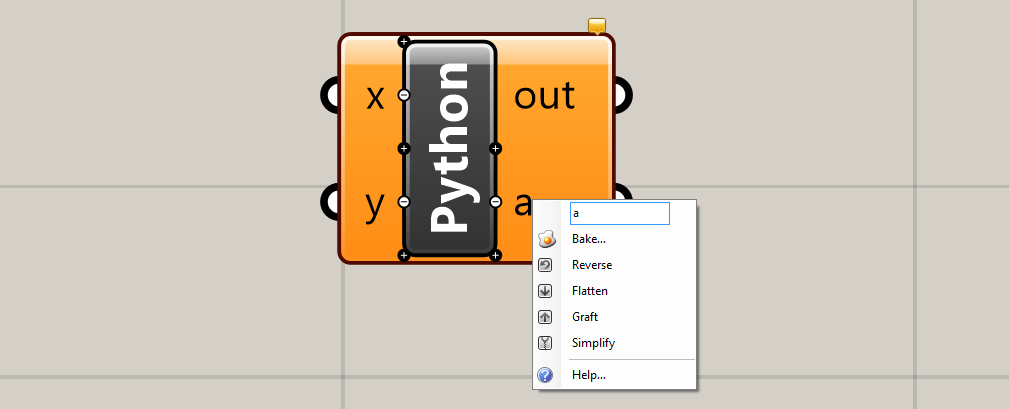
These inputs and outputs are automatically brought into the Python script where you can use them as variables. This allows the Python script to interact with the rest of your Grasshopper model by bringing data in through input variables and then outputting other data that was created within the script.
Double clicking on the center of the component brings up the script editing window where you can write the actual Python code. Let's create a simple 'hello world' example to see how this works.
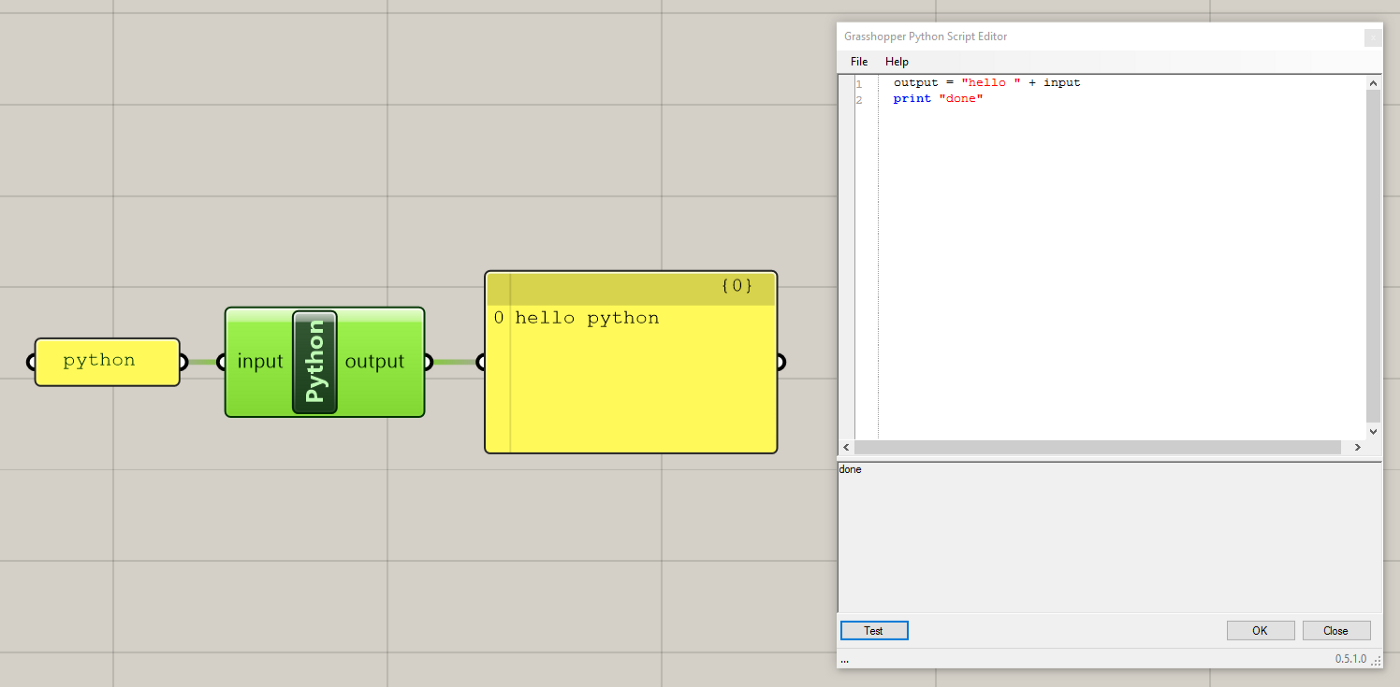
GHPython 'hello world'
Change the name of one of the Python component's inputs to 'input' and the name of one of the outputs to 'output'. Connect a Panel component into the input and type whatever you want into the Panel. Attach another Panel component to the output so we can see the results.
Now type this line of code into the script window:
output = "hello " + input
and click the Test button at the lower left corner of the code window. This button will execute the script and you should see the results above. Clicking OK will save changes to your script and close the editor window. Clicking Close will close the window without saving changes. This simple example brings in text from the Grasshopper canvas through its input port, joins this text to another piece of text, and then assigns the result to the output port, which can then be used on the Grasshopper canvas.
+Exercise: Working with the Rhino API
We now have a solid foundation for how to run Python code from within the Grasshopper environment. Integrating code into Grasshopper like this is a very powerful way to extend the basic functionalities of Grasshopper and will allow us to create interesting and complex models using the full tools of computation. You can think of the Python component as a way to create your own custom components in Grasshopper. In fact, each Grasshopper component does contain code that tells it what to do, except the code is hidden from us and written in a different programming language.
At this point you should be ready to start learning Python with a small exercise. In this exercise you will learn how to import the Rhino libraries into Python which will give you access to all of Rhino's native classes, including it's geometry types, so you can start working with them within your Python scripts. We will cover how to import each library and demonstrate its use through a basic example.
+Working with libraries
By design, the core Python language is fairly limited in functionality, being restricted to basic algebra, data types and flow control structures, and support for creating functions and classes. This is done intentionally to keep the core Python language as abstract, minimal, and fast as possible. To extend Python's functionality to more specialized use cases, we rely on external libraries which are written in Python code and define custom classes and functions that are useful for specific tasks.
To use these libraries we must first make sure they are installed into our version of Python, and then we need to import them into our script. Some very common libraries such as random or math come pre-installed with Python but still must be imported into every script we want to use them in. Other libraries such as numpy must be installed separately before they can be imported into our scripts.
Importing these libraries into our code is equivalent to bringing all this specialized code into our program, so that we can use it in our own code. This allows developers to build on top of existing functionality instead of needing to build from scratch each time. This idea of building on the work of others has been a huge part in the development of Python and other popular programming languages and is strongly tied to the philosophies of open source software movement.
One of the specialized use cases supported by custom libraries is integrating Python into an existing software product. In this case, the product can expose its underlying functionality through a set of Python classes defined in a library that is imported into each Python script. We will see how this works with Rhino in the next section.
+Accessing the Rhino libraries
To enable us to work with geometry in Python, Rhino provides several pre-installed libraries, three of which we will cover in this section:
- ghpythonlib.components: allows you to directly reference Grasshopper components in Python code
- Rhino.Geometry: allows you to access all commands and data types in the main RhinoCommon library
- rhinoscriptsyntax: a wrapper over the
Rhino.Geometrylibrary which provides similar commands and functionality to Rhinoscript
Let's see how each one of these work through an example. We will create a simple Python script that takes a point as an input and creates a circle with that point as the center and a radius of '2'. The Grasshopper definition consists of a Python component with one input and one output, a Point component connected to the input, and a Panel component connected to the output so we can see the results.
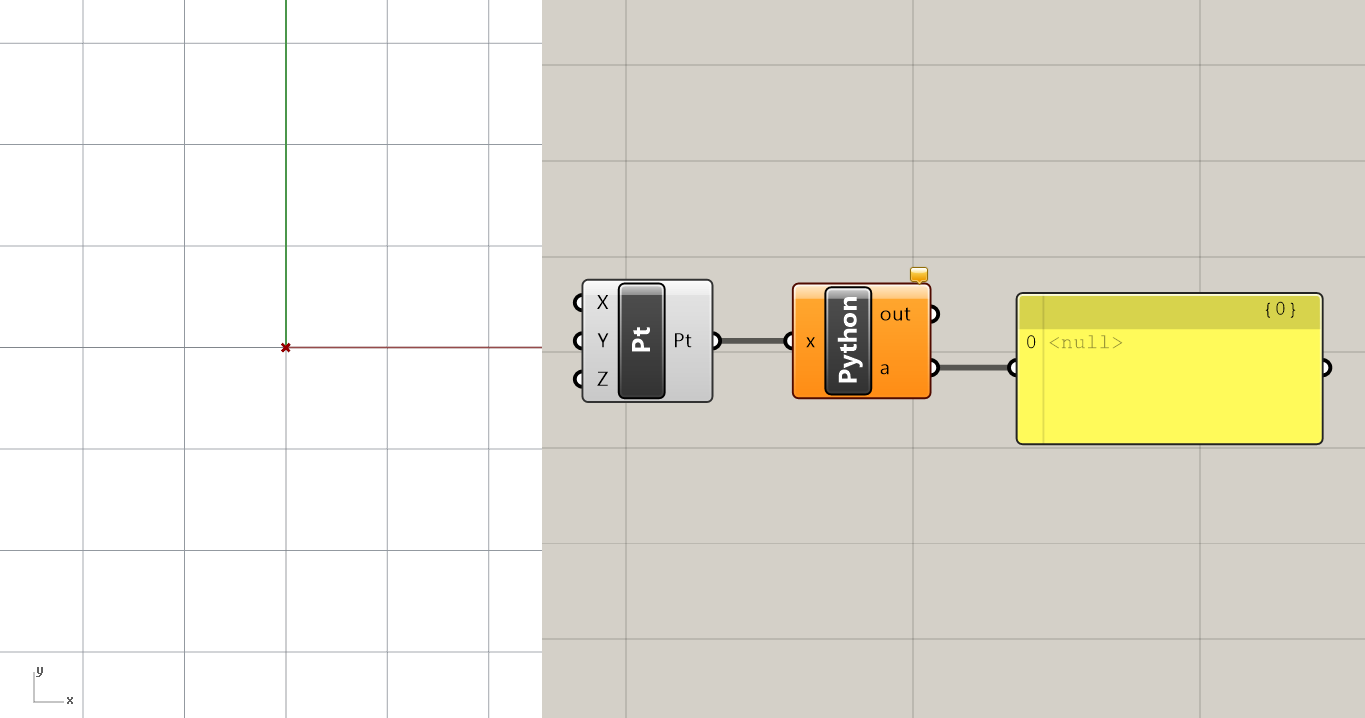
Initial setup of basic example in Grasshopper
+Inputting geometry
Double-click on the Python component to open up the Python script editor. First, let's see how the input point is represented in Python. We can see this by printing the input's value and using Python's type() function to print its type. Type these lines in the script and click the 'Test' button to see the results:
print(x)
print(type(x))
You should see something like this:
ac7825d2-24b0-4225-b52a-f04a3daa0849
<type 'Guid'>
Wait a second, didn't we input a point—why are we getting this 'Guid'?
By default any geometry input into a Python component is not brought in as the geometry itself, but as a reference to the geometry in the Grasshopper environment. This reference is stored in the geometry's unique ID number, a text string called a 'Guid'. This can create problems for most geometric functions, which expect actual geometry data instead of a 'Guid' reference.
We can fix this by telling Python exactly what kind of data we are inputting using 'Type hints'. To set the input's type, right click on the 'x' input of the Python component`, go to 'Type hint', and select 'Point3d'. The 'Type hint' menu shows all the geometry types supported by Grasshopper. When we specify that the input is of the type 'Point3d', Python will automatically convert the 'Guid' reference to the actual point geometry so that we can use it with geometric functions in our script.
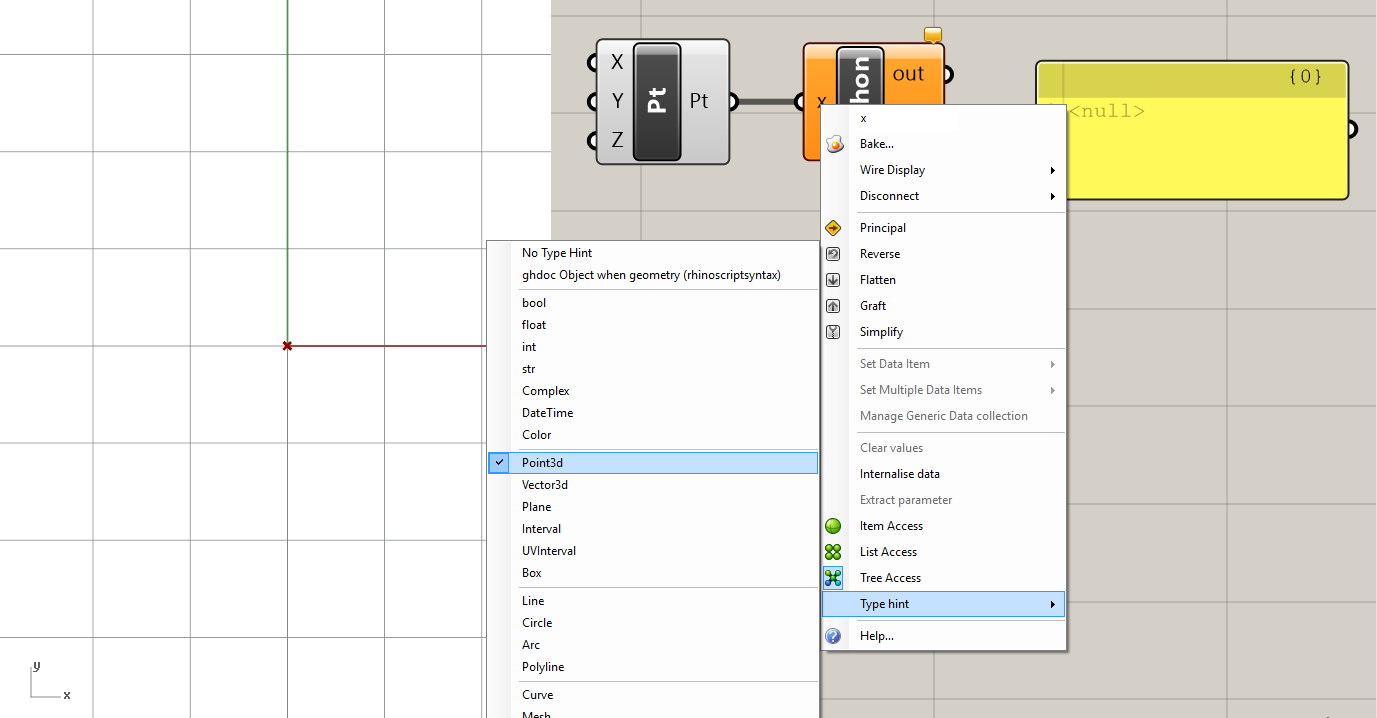
Setting the 'Type hint' for a Python input
+Be careful!
If Python fails to convert your input data to the type specified in the type hint (for example if you try to input text into an input expecting a number or point), Python will throw an error which can be hard to debug since it's not coming from your actual code.
Once you get the hang of it though, setting type hints is actually good practice as it makes data types more explicit and can expose errors sooner before they can manifest in more complicated bugs within your code.
+Working with the Rhino libraries
Now that we have correctly specified the type of the geometry we are inputting, we can start to build our simple script. In this last section we will import each of the three main libraries and work through a small demo with each one.
+The ghpythonlib.components library
We will start by importing the ghpythonlib.components library. Delete the previous two lines and type on the first line:
import ghpythonlib.components as ghcomp
This will import the components portion of the main ghpythonlib library into our script so we can use its methods to work with geometry. We use the import ... as ... syntax to give the library a shorter keyword that will save us typing and make the script cleaner. Now when we want to use the library we can reference it with ghcomp rather than typing the full ghpythonlib.components each time.
The ghpythonlib.components library contains methods that replicate the behavior of each component in Grasshopper. Each method expects the same number and type of inputs as its Grasshopper component equivalent, and returns the same outputs. If the component has more than one output the return will be a list whose length is the number of outputs.
Let's use the library's Circle method to create a circle based on a center point and radius, just like the Circle component in Grasshopper. On the next line type:
a = ghcomp.Circle(x, 2)
As expected this creates a circle with a radius of 2, centered on the input point.
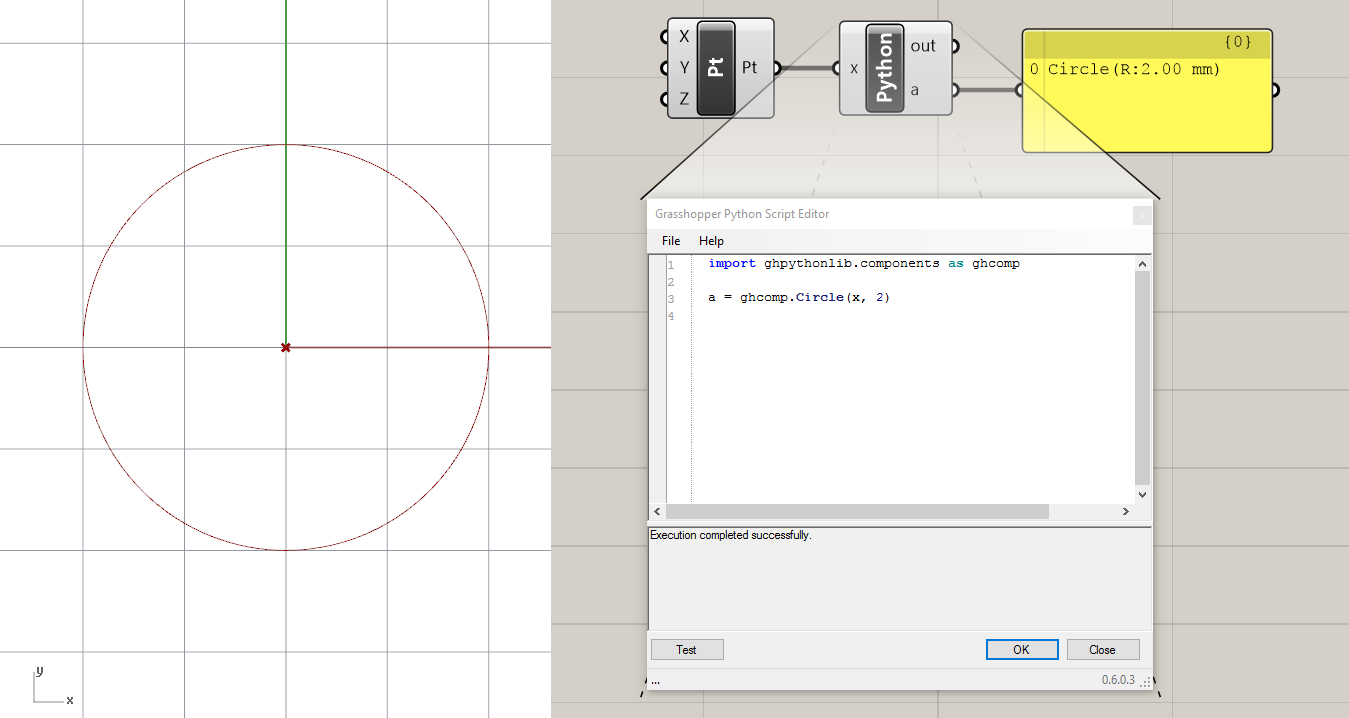
Creating a circle with Python
+The Rhino.Geometry library
Now let's do the same thing with the Rhino.Geometry library. Below the first import line, type:
import Rhino.Geometry as rh
This line imports the Geometry portion of the main Rhino library and assigns it the keyword rh. Now we can change the line of code that creates the circle to:
a = rh.Circle(x, 2)
If you run the script you will see that the result is exactly the same—a circle centered on our input point with a radius of 2.
+The rhinoscriptsyntax library
Finally, let's look at the same example using the rhinoscriptsyntax library. We can import the library by typing:
import rhinoscriptsyntax as rs
and use the library's .AddCircle() method to create a new circle based on the input point and radius.
a = rs.AddCircle(x, 2)
+CHALLENGE 4: Parametric circles, Part 2
Can you add a slider to our definition to control the radius of the circle?
Hint: create a new input in the
Pythoncomponent using the Zoomable UI and connect to it a newNumber Slider. Then use the variable name of the input inside the Python code to replace the hard-coded value of '2'.
+Getting help
One major difficulty when starting to work with libraries such as rhinoscriptsyntax or Rhino.Geometry is knowing the exact syntax of each geometric class available and its methods, what to pass in for inputs, and what returns to expect. In Grasshopper you can easily see what components are available to you by looking through the options in the toolbar. You can also see each component's expected inputs and outputs by looking at the ports of the component. This is more difficult with code, since there is no graphic interface for any of the methods. So how do we know what methods are available and how to use them?
The best way is to search through the documentation of each library, which contains a full description of each class implemented by the library and its methods. You can find the documentation for rhinoscriptsyntax and Rhino.Geometry here:
- http://developer.rhino3d.com/api/RhinoScriptSyntax - documentation for the rhinoscriptsyntax Library with a description of each method and data type supported
- https://github.com/mcneel/rhinoscriptsyntax - source code of the rhinoscriptsyntax Library which shows how each method is implemented using RhinoCommon
- http://4.rhino3d.com/5/rhinocommon/ - documentation of the full RhinoCommon Library including all data types and methods with Python examples for each one.
In practice, searching through full documentation can be difficult and confusing for someone just getting started, so the Python script editor provides two tools that make it easier to find out what methods are available in a Library and how to use them.
The first is the autocomplete feature, which gives you hints on what methods are available in the Library as you type the code. You may have already noticed it as you were writing the lines above. Let's type the line:
a = rh.Circle(x, 2)
again character by character to see how this works. Remember that rh is a keyword representing the Rhino.Geometry library, and the . symbol is Python's way of accessing a class from a library or a method or property from a class. Once you type in the . symbol, a window will pop up with a list of all the classes in that library. This would also work if you had an instance of a class and were trying to access it's methods and properties. As you continue typing, the pop-up list will automatically scroll down to the portion you are typing and highlight the best matching class name. Once you see the class you want highlighted you can press 'Enter' or double-click on the name to enter the class name into the script.
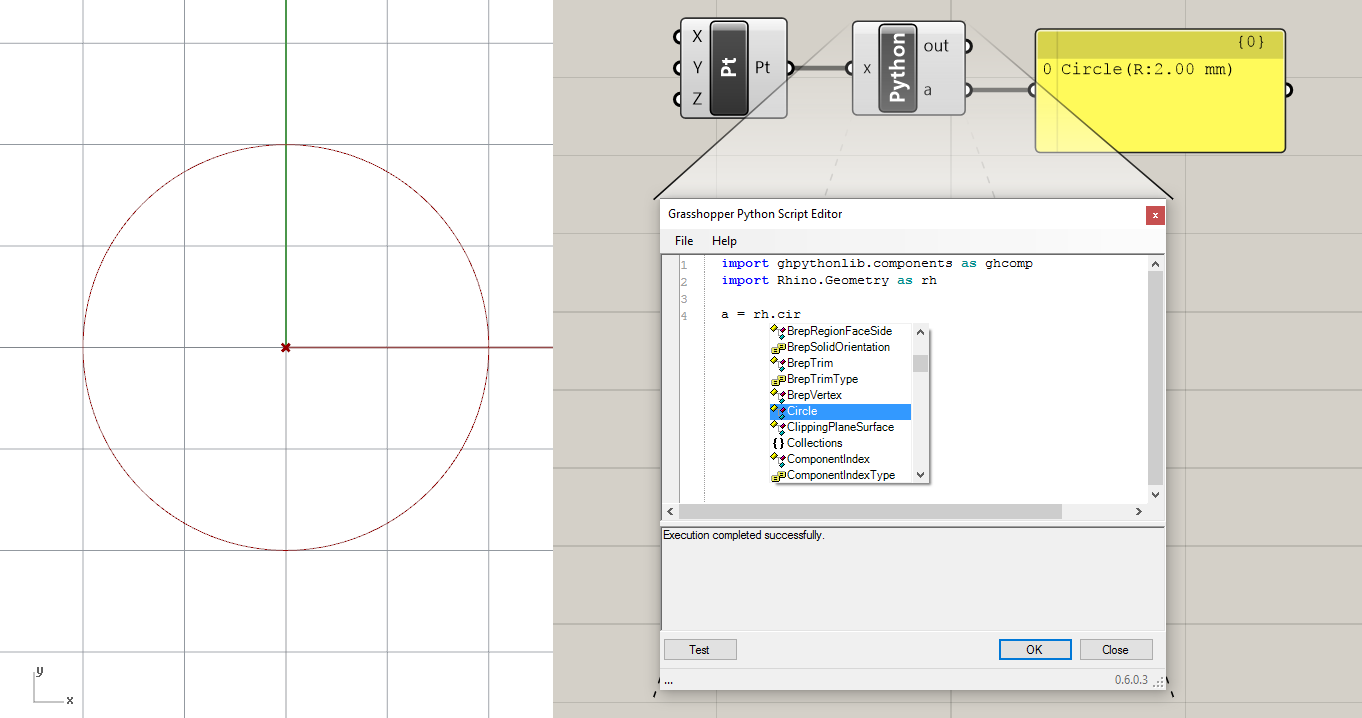
Browsing classes within a Library
Following the class or method name you typically place a set of parenthesis where you pass in the method or class constructor's inputs. Once you type the first ( the Python window will automatically load the documentation of that method into the results windows which tells you what inputs the method expects and what outputs it generates.
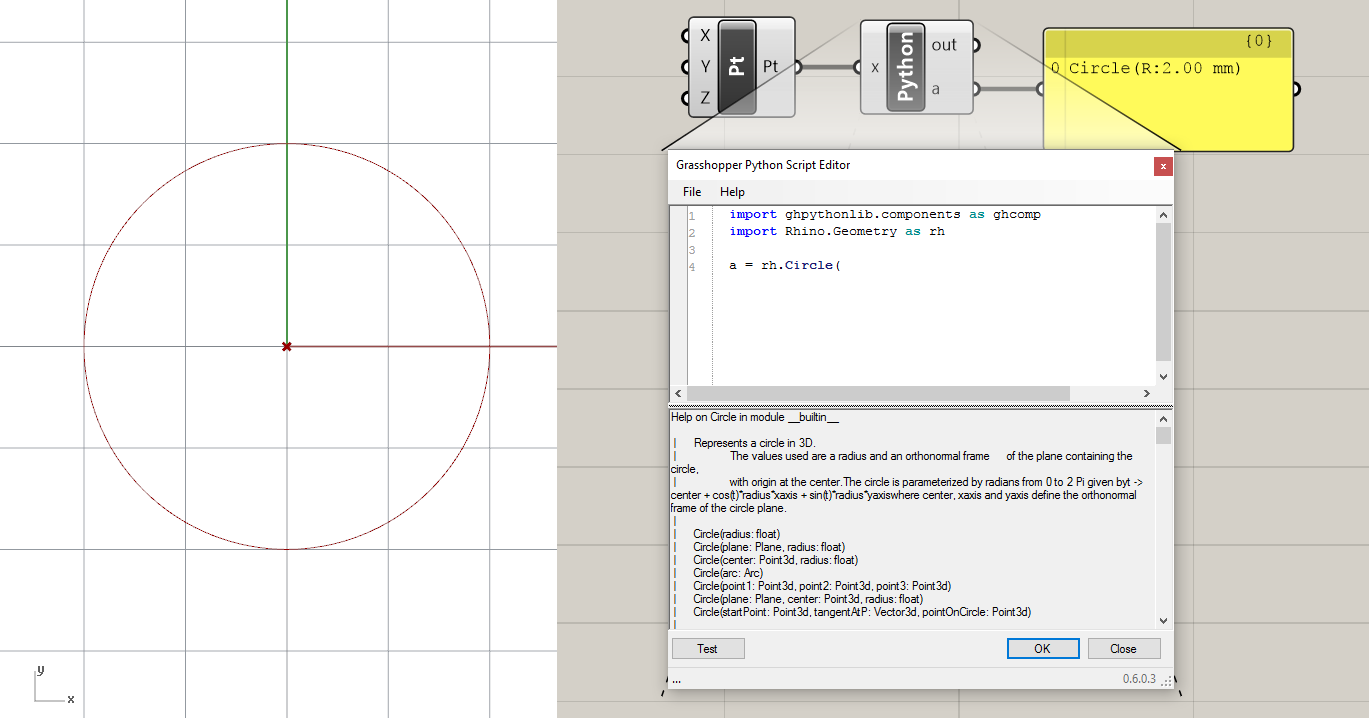
Reading documentation for a method
In the case of the .Circle() class constructor method you can see that it actually supports many different combinations of inputs. In Python this is called 'overloading' a method, and allows a single method to do different things based on different combinations of inputs.
In this case it allows us to create circles in several different ways such as based on a center and radius or based on 3 points. Overloading is another advantage of using the Rhino.Geometry library over the ghpythonlib.components Library. Instead of remembering the 7 different components for creating circles in Grasshopper, we have a single Circle class which can make circles in different ways based on the inputs we give its constructor.
+Conclusion
We have now seen three different libraries that allow you to work with geometry in Python, so which one should you use? Ultimately all three do basically the same thing and create the same exact geometry, but they each come with certain benefits and limitations:
- The ghpythonlib.components library makes it easier to get started because you can directly use the same components you are used to using in Grasshopper. However you are restricted to what is available in Grasshopper, and some of the methods can be clunky compared to those in RhinoCommon.
- The rhinoscriptsyntax library was created to make it easier for those already used to using RhinoScript to transition to using Python. The methods in the rhinoscriptsyntax library replicate those in RhinoScript, but do so by 'wrapping up' methods from RhinoCommon. Thus they may make some geometric operations easier and cleaner, but also limit the scope of possibilities compared to using the full RhinoCommon.
- The Rhino.Geometry library is the most comprehensive and robust way to work with geometry in Python because it exposes all of the methods in the full RhinoCommon library. RhinoCommon is a universal cross-platform library developed by McNeel for the release of Rhino 5 which allows all versions of Rhino and Grasshopper to access the same geometric data types and methods. By tapping into this library we gain access to everything Rhino is capable of, which allows us to do things we could not do with either Grasshopper or RhinoScript.
Although all three libraries are useful to know (especially since you will fine examples using all of them online), the following tutorials will focus mostly on the Rhino.Geometry library as it is the most flexible one and is the most closely connected to the core RhinoCommon API.
The next set of guides will introduce basic concepts of the Python language which are not specific to geometry or Rhino and can be run in any environment. However, unless you have a reason to run Python elsewhere I would encourage you to follow along with those tutorials by typing the code and executing it within a Python component in Grasshopper. Although it can be tempting to just read through the code samples, the best way to learn and retain knowledge is by writing out the actual code yourself (avoid copy/paste if you can!) and stumbling on and fixing bugs in syntax as you go.
+Learning more
For more information about learning the Python programming language you can follow these guides:
- https://wiki.python.org/moin/BeginnersGuide/NonProgrammers
- https://wiki.python.org/moin/BeginnersGuide/Programmers
For more specific information on working with Python in Rhino and Grasshopper you can consult these resources:
- http://developer.rhino3d.com/guides/rhinopython/: Rhino's Python support page.
- http://www.rhino3d.com/download/IronPython/5.0/RhinoPython101: book about using Python in Rhino.
- https://developer.rhino3d.com/api/RhinoCommon/html/R_Project_RhinoCommon.htm: documentation of the Rhino API. This includes documentation of all of Rhino's native classes as well as code samples in Python as well as C# and VB.
- http://developer.rhino3d.com/api/RhinoScriptSyntax/win/: documentation of the rhinoscriptsyntax library. This is a helper library that makes some functionalities easier to write in code. It was developed to replicate some of the functionalities of the old RhinoScript syntax making it easier to transition from RhinoScript to Python.
- http://developer.rhino3d.com/guides/rhinopython/python-rhinoscriptsyntax-introduction/: support for the rhinoscriptsyntax Python library.
